Spring Boot

Spring Boot

概述:

设计目的是用来简化新Spring应用的初始搭建以及开发过程. 该框架使用了特定的方式来进行配置, 从而使开发人员不再需要定义样板化的配置.

AnnotationConfig配置IoC:

定义:

使用注解彻底替代XML文件,把Bean定义到Java配置类中.

注解 作用
@Configuration 贴在配置类上,声明该类为Spring配置类
@Bean 贴在配置类的方法上,该方法的返回对象交给Spring容器管理
@ComponentScan 贴在配置类上,开启组件扫描器,默认扫描当前配置类所在的包,可指定包

AnnotationConfigApplicationContext: 该类是ApplicationContext接口的实现类,该对象是基于AnnotationConfig的方式来运作的Spring容器

注解方式声明自己定义的配置类

注解 作用
@Configuration 表示该类是Spring的配置类
@ComponentScan 开启组件扫描器,默认扫描当前类所在的包,及其子包

当扫描的包不是当前类所在的包时,可以通过注解中的value属性来修改扫描的包.

组件扫描的方式只能扫描我们自己写的组件,如果某个bean不是我们自己写的,例如:连接池.则还是要通过在配置类中定义方法来处理,两者是可以同时存在的.

SpringTest方式加载配置类

@RunWith(SpringJUnit4ClassRunner.class)
@ContextConfiguration(classes={配置类1.class, 配置类2.class, …}):配置classes属性来指定哪些类是配置类

Bean标签

在@bean标签中id,name,init-method,destroy-method,scope等属性来完成对应的配置.

@Bean注解中的属性

属性名 作用
@name 用于给name取别名
@initMethod 配置bean的初始化方法
@destroyMethod 配置bean的销毁方法
@Scope 属性名prototype,配置多例,默认是单例

AnnotationConfig方式配置DI:

前提:

先要把贴@bean,把bean交给Spring管理,然后在把bean注入过去,再使用setter方法设置关系.

把需要注入的Bean对象作为参数传入到另一个Bean的方法声明中,形参名称最好跟Bean的id一致

1
2
3
4
5
6
7
//在声明SomeBean的方法形参中直接注入OtherBean对象
@Bean
public SomeBean someBean(OtherBean otherBean) {
SomeBean someBean = new SomeBean();
someBean.setOtherBean(otherBean);
return someBean;
}

配置文件导入

在Spring项目中,用到多个配置文件,分别配置不同的组件.最后关联到主配置文件中

使用注解@Import

1
2
3
4
5
6
7
//主配置类
@Configuration
@Import(OtherConfig.class) //在主配置类中关联分支配置类 public class MainConfig { ... }

//分支配置类
@Configuration
public class OtherConfig { ... }

在主配置类中关联XML配置

使用注解@ImportResource

1
2
3
4
//主配置类
@Configuration
@ImportResource("classpath:applicationContext.xml") //在主配置类中关联XML配置
public class MainConfig { ... }

导入属性文件

使用注解@PropertySource + @Value

1
2
3
4
5
6
7
8
9
10
11
12
13
14
15
16
17
18
19
20
21
22
23
24
25
/**
* @PropertySource:把属性配置加载到Spring的环境对象中 * @Value:从Spring环境对象中根据key读取value
*/
@Configuration
@PropertySource("classpath:db.properties")
public class AnnotationConfig {

@Value("${jdbc.url}")
private String url;
@Value("${jdbc.username}")

private String username;
@Value("${jdbc.password}")

private String password;
@Bean(initMethod="init", destroyMethod="close")

public DruidDataSource dataSource() {
DruidDataSource dataSource = new DruidDataSource();
dataSource.setUrl(url);
dataSource.setUsername(username);
dataSource.setPassword(password);
return dataSource;
}
}

或者直接在配置类中注入Spring的环境对象

1
2
3
4
5
  /**
* environment:表示Spring的环境对象,该对象包含了加载的属性数据
*/
@Autowired
private Environment environment;
1
2
3
dataSource.setUrl(environment.getProperty("jdbc.url"));
dataSource.setUsername(environment.getProperty("jdbc.username"));
dataSource.setPassword(environment.getProperty("jdbc.password"));

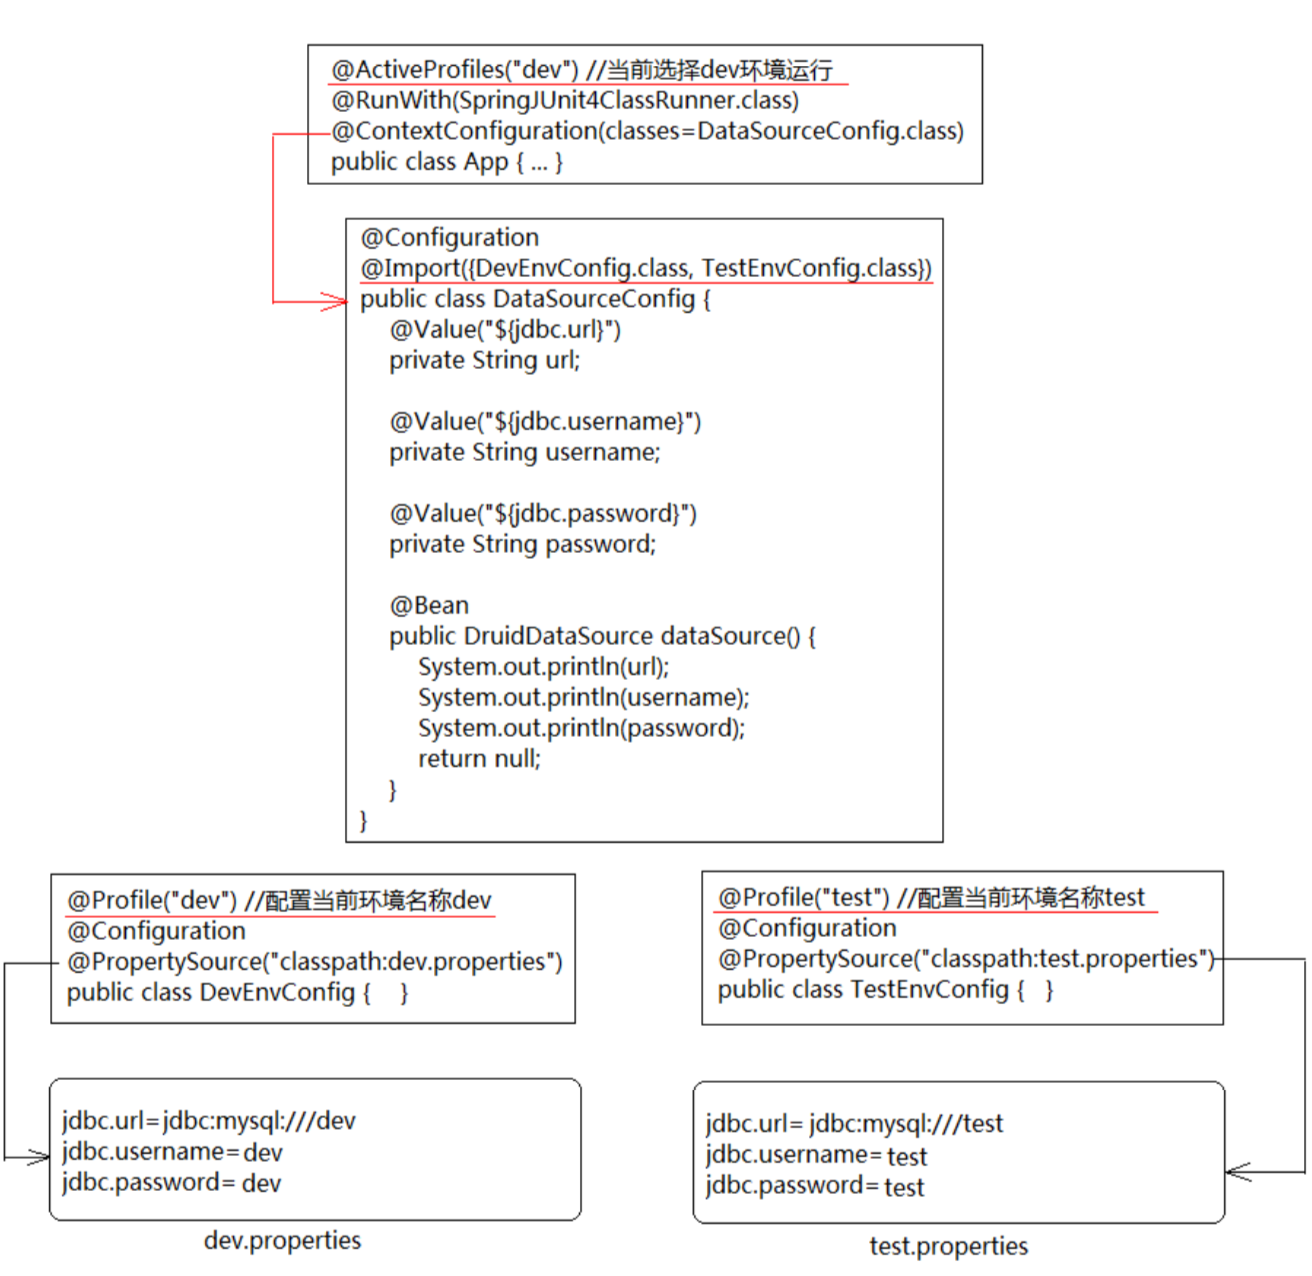
切换运行环境

image-20190624210559786

Spring Boot 的web

对于Spring Boot项目来说无论是普通应用还是web应用打包方式都是jar包即可,web也可以打成war包.但是需要额外添加其他插件,比较麻烦.

模块 作用
spring-boot-starter-parent 管理和导入基础依赖
spring-boot-starter-web 集成了web应用所需的环境和工具
@SpringBootApplication 三大注解功能的集成
SpringApplication.run(..) 启动SpringBoot应用,加载自定义的配置类,启动嵌入的Tomcat服务器

@SpringBootApplication三大注解功能

  • @ComponentScan: 开启组件扫描
  • @SpringBootConfiguration: 作用等同于@Configuration注解,也是用于标记配置类
  • @EnableAutoConfiguration: 加载jar包中META-INF/spring.factories文件中配置的配置对象,自动配
    置定义的功能,包括: AOP / PropertyPlaceholder / FreeMarker / HttpMessageConverter / Jackson /
    DataSource / DataSourceTransactionManager / DispatcherServlet / WebMvc 等等
    • AutoConfigurationImportSelector自动配置类中的getCandidateConfigurations方法,加载spring.factories,其中有很多配置对象.

SpringBoot项目的独立运行

需要spring打包插件—>spring-boot-maven-plugin

  1. 使用maven的package命令进行打包
  2. 使用命令java -jar xxx.jar运行jar包

spring boot 目录结构
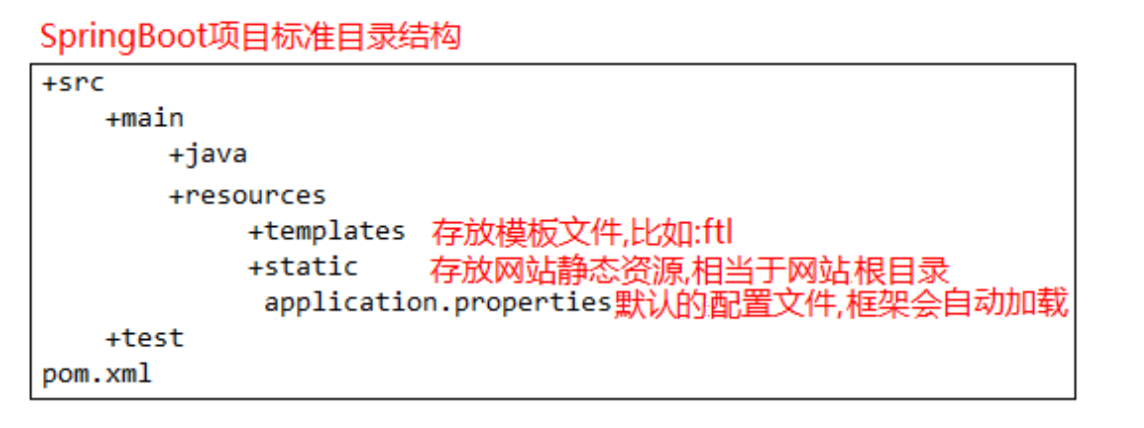
image-20190624214636949

SpringBoot参数配置

application.properties优先级

一个项目中可以有多个application.properties文件存放在不同目录中,此时他们会遵循固定的优先级来处理有冲突的属性配置

  • 项目/config/application.properties ——>最高
  • 项目/application.properties
  • classpath:config/application.properties
  • classpath:application.proper ——>最低(常用)

属性绑定

使用@Value绑定单个属性

@ConfigurationProperties绑定对象属性,可以把同类的配置信息自动封装成实体类

1
2
3
4
5
6
7
//贴在类上
@Component
@ConfigurationProperties("jdbc")
public class MyDataSource {
private String username;
private String password;
}

或者

1
2
3
4
5
6
//贴在方法上
@Bean
@ConfigurationProperties("jdbc")
public MyDataSource myDataSource() {
return new MyDataSource();
}

静态资源

  • Spring Boot默认会从classpath下的/static,/public,/resources,/META-INF/resources寻找静态资源

  • 可以通过修改spring.resources.staticLocations来修改静态资源加载地址

  • 文件上传必须去配置文件所在的路径

集成FreeMarker只需添加starter工具包

1
2
3
4
5
   <!-- SpringBoot集成FreeMarker的依赖 --> 
<dependency>
<groupId>org.springframework.boot</groupId>
<artifactId>spring-boot-starter-freemarker</artifactId>
</dependency>

统一异常处理

自定义一个控制器增强器,专门用于统一异常处理

使用@ControllerAdvice注解: —> 控制器增强器

1
2
3
4
5
6
7
8
@ControllerAdvice //控制器增强器
public class ExceptionControllerAdvice {
@ExceptionHandler(Exception.class) //处理什么类型的异常
public String handlException(Exception e, Model model) {
model.addAttribute("msg", e.getMessage());
return "errorView"; //逻辑视图名称
}
}

集成Druid

1
2
3
4
5
6
7
8
9
10
11
12
13
14
15
16
 <!-- druid -->
<dependency>
<groupId>com.alibaba</groupId>
<artifactId>druid</artifactId>
<version>1.1.10</version>
</dependency>
<!-- MySQL驱动 -->
<dependency>
<groupId>mysql</groupId>
<artifactId>mysql-connector-java</artifactId>
</dependency>
<!-- SpringBoot集成jdbc的依赖 -->
<dependency>
<groupId>org.springframework.boot</groupId>
<artifactId>spring-boot-starter-jdbc</artifactId>
</dependency>

两种配置方式

第一种:配置对象方式

1
2
3
4
5
#application.properties
jdbc.driverClassName=com.mysql.jdbc.Driver
jdbc.url=jdbc:mysql:///rbac?useUnicode=true&characterEncoding=utf8&serverTimezone=GMT%2B8
jdbc.username=root
jdbc.password=admin

在java的方法上,使用@ConfigurationProperties注解绑定对象属性.

1
2
3
4
5
@Bean(initMethod="init", destroyMethod="close")
@ConfigurationProperties("jdbc")
public DruidDataSource dataSource() {
return new DruidDataSource();
}

第二种:自动配置方式

1
2
3
4
5
6
7
8
#application.properties
#自动配置连接池
spring.datasource.type=com.alibaba.druid.pool.DruidDataSource
spring.datasource.driver-class-name=com.mysql.cj.jdbc.Driver
spring.datasource.url=jdbc:mysql:///rbac?
useUnicode=true&characterEncoding=utf8&serverTimezone=GMT%2B8
spring.datasource.username=root
spring.datasource.password=admin

集成Mybatis

1
2
3
4
5
6
<!--mybatis集成到SpringBoot中的依赖--> 
<dependency>
<groupId>org.mybatis.spring.boot</groupId>
<artifactId>mybatis-spring-boot-starter</artifactId>
<version>1.3.2</version>
</dependency>
1
2
3
4
5
6
7
8
9
10
11
12
#application.properties 
#之前在XML配置了哪些属性在这里就配置哪些属性,属性前缀
#懒加载
mybatis.configuration.aggressive-lazy-loading=true
mybatis.configuration.lazy-load-trigger-methods=clone
#扫描mapper文件
mybatis.mapper-locations=classpath:me/cscar/xxx/mapper/*Mapper.xml
#配置全限定名
mybatis.type-aliases-package=me.cscar.xxx.domain
#连接池对象不用配置,会自动注入
#打印SQL日志
logging.level.包名=trace

在MyBatis框架使用注解操作数据库

在mapper接口中的抽象方法中贴上各自对应的注解

在属性中写SQL语句

1
2
@Insert("插入的SQL语句")//插入
@Select("查询的SQL语句")//查询

查询后需要封装对象使用@Results注解

1
2
3
4
5
@Results({
@Result(id=true, property="id", column="id"),
@Result(property="name", column="name"),
@Result(property="age", column="age")
})

Mapper接口扫描器只要在配置类上贴个注解@MapperScan(…)即可

事务管理

1
2
3
4
5
<!-- AOP织入的依赖 --> 
<dependency>
<groupId>org.aspectj</groupId>
<artifactId>aspectjweaver</artifactId>
</dependency>

注解方式

在配置类(AppConfig)上贴@EnableTransactionManagement —> 开启事物管理 (2.x)版本以上不需要配置

业务层实现类上或者其方法上直接贴 @Transactional注解 —> 对业务操作做事物管理

SpringBoot默认优先选择CGLIB代理

如果需要改为优先使用JDK代理,则配置spring.aop.proxy-target-class=false #优先使用JDK代理

拦截器

让自定义的拦截器实现WebMvcConfigurer接口,重写addInterceptors方法即可

1
2
3
4
5
6
7
8
9
10
11
12
@SpringBootApplication
public class AppConfig implements WebMvcConfigurer {
public static void main(String[] args) {
SpringApplication.run(AppConfig.class, args);
}
public void addInterceptors(InterceptorRegistry registry) {
registry.addInterceptor(new AppConfig) //传入自定义拦截器对象
// 对哪些资源起过滤作用
.addPathPatterns("/**")
// 对哪些资源起排除作用
.excludePathPatterns("/..");
} }