Docker

Docker

docker概述

发布一个项目.(jar + (redis + MySQL + jdk + …) ),带上环境一起打包.

在服务器配置一个应用环境,配置麻烦,不能够跨平台.Windows -> Linux

开发打包部署上线,一套流程做完.

docker解决以上问题.

JRE — 多个应用(端口冲突) —原来都是交叉

隔离机制: Docker核心思想.
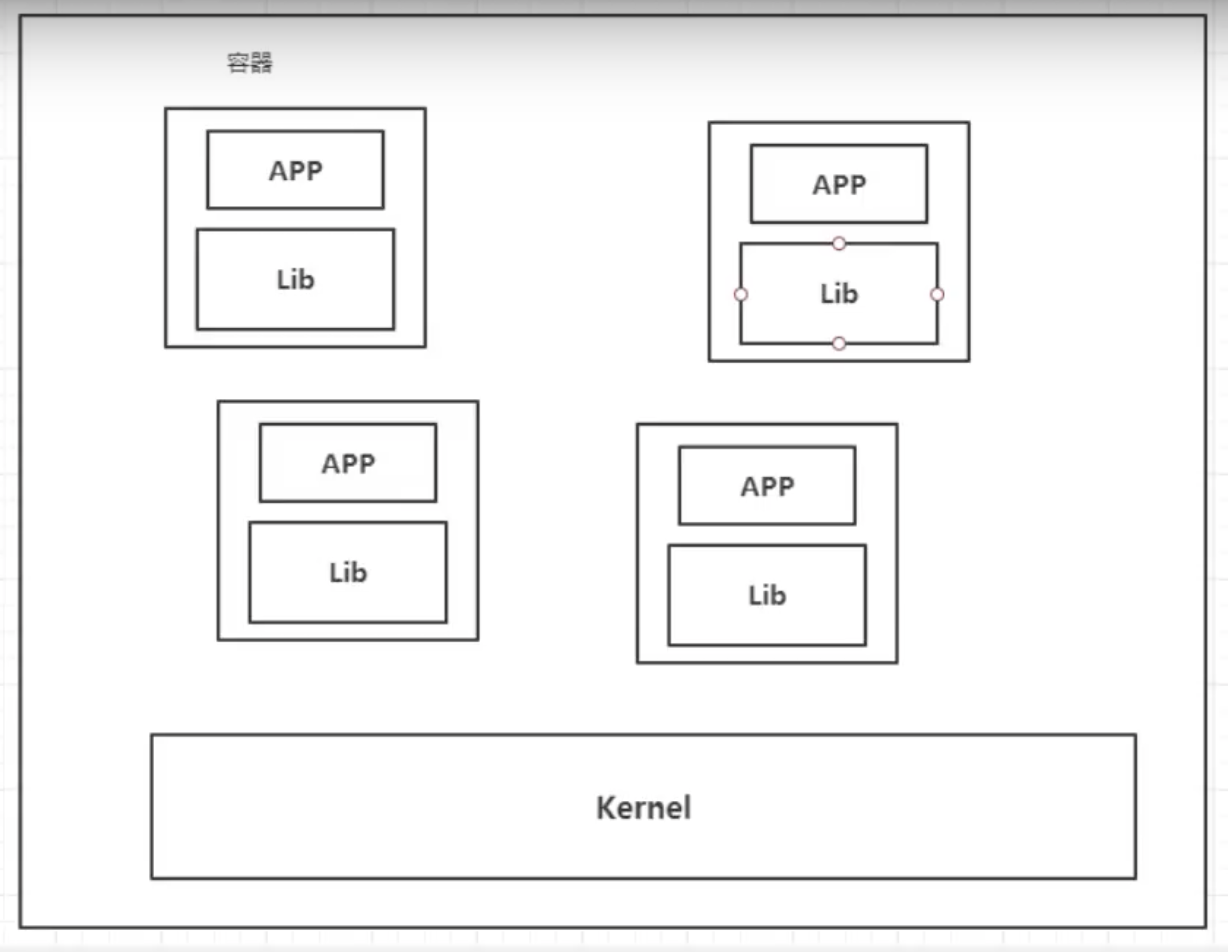
image-20201226180131766

容器化技术不是模拟一个完整的操作系统

  • 传统虚拟机,虚拟出一堆硬件,运行一个完整的操作系统,然后在这个系统上安装和运行文件.
  • 容器内的应用直接运行在 宿主机的内容,容器是没有自己的内核的.也没有虚拟硬件,所以轻便.
  • 每个容器互相隔离,每个容器内都有属于自己的一个文件系统,互不影响.

DveOps(开发、运维)

应用更快速地交付和部署.

传统: 一堆帮助文档,安装运行.

Docker: 打包镜像发布测试,一键运行.

更便捷地升级和扩容

项目打包为一个镜像,扩展 服务器A 服务器B

更简单的系统运维

容器化后,开发和测试环境高度一致.

更高效的计算资源利用

Docker 是内核级别的 虚拟化,可以在物理的机器上运行很多容器实例,把服务器性能压榨到极致.

docker的基本组成
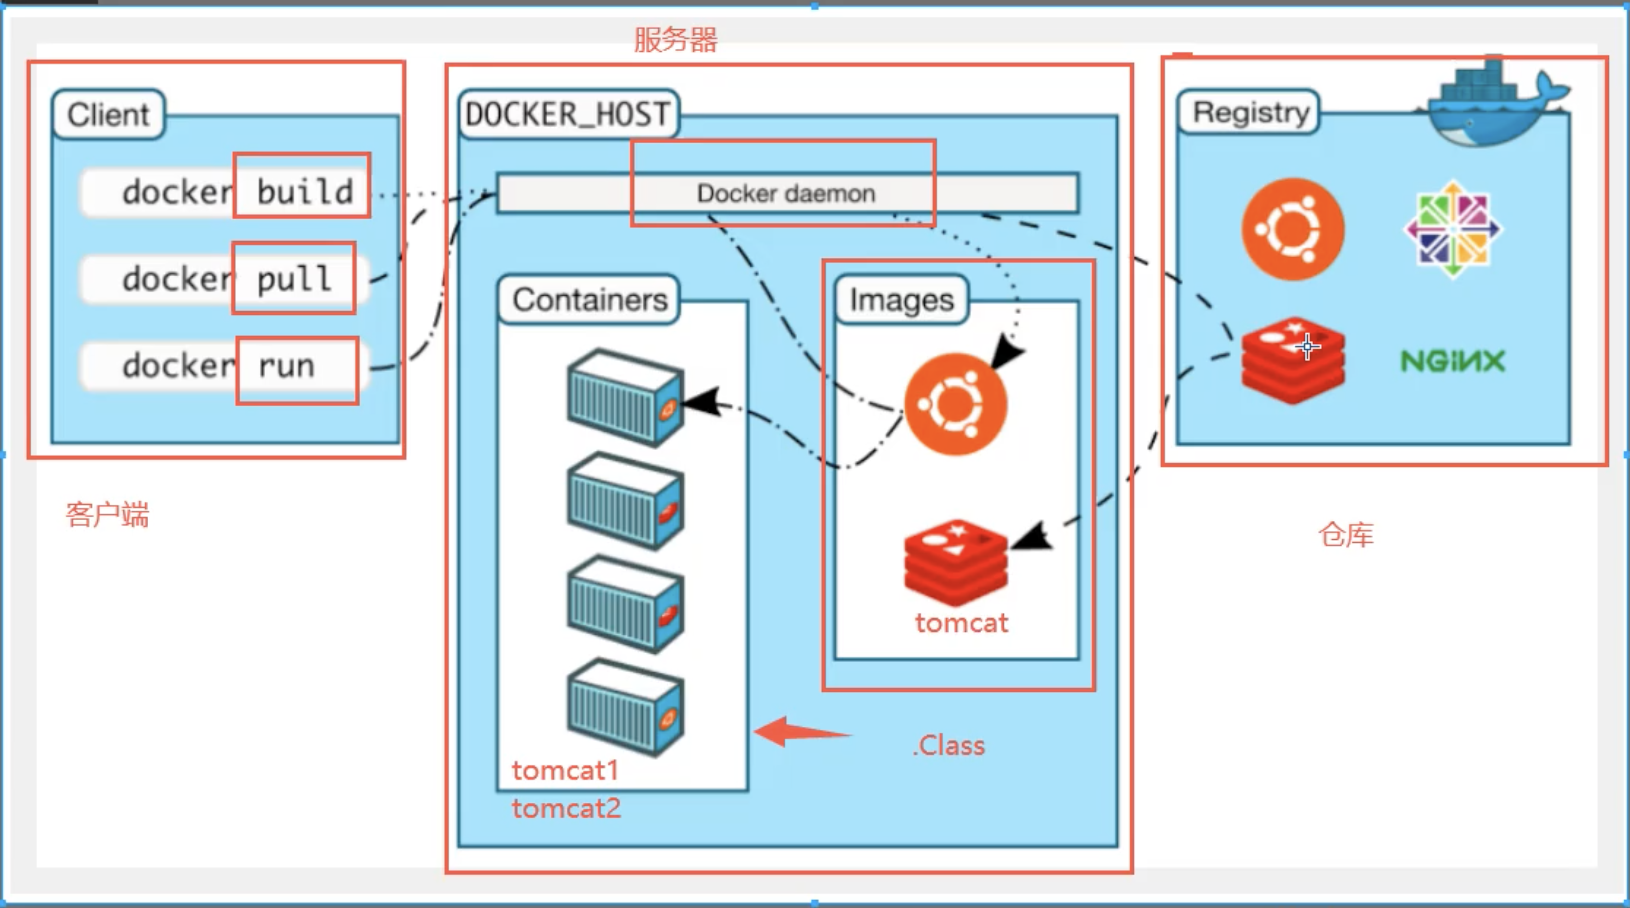
image-20201226180225960

镜像(image):

docker就好比一个模板,可以通过这个模板来创建容器服务,Tomcat镜像 => run => Tomcat01容器 (提供服务器)

通过这个镜像可以创建多个容器(最终服务运行或者项目运行就是在容器中的)

容器(container):

docker利用容器技术,独立运行一个或者一组应用,通过容器来创建的.

启动、停止、删除,基本命令!

容器就是一个简易的Linux系统.

仓库(repository):

仓库就是存放镜像的地方.

仓库分为共有仓库和私有仓库.

容器服务器:

dockerhub

阿里云…配置镜像加速.

docker安装

环境查看

1
2
3
#系统内核 3.10 以上
[root@VM-0-17-centos ~]# uname -r
3.10.0-1062.18.1.el7.x86_64
1
2
3
4
5
6
7
8
9
10
11
12
13
14
15
16
17
#系统版本
[root@VM-0-17-centos ~]# cat /etc/os-release
NAME="CentOS Linux"
VERSION="7 (Core)"
ID="centos"
ID_LIKE="rhel fedora"
VERSION_ID="7"
PRETTY_NAME="CentOS Linux 7 (Core)"
ANSI_COLOR="0;31"
CPE_NAME="cpe:/o:centos:centos:7"
HOME_URL="https://www.centos.org/"
BUG_REPORT_URL="https://bugs.centos.org/"

CENTOS_MANTISBT_PROJECT="CentOS-7"
CENTOS_MANTISBT_PROJECT_VERSION="7"
REDHAT_SUPPORT_PRODUCT="centos"
REDHAT_SUPPORT_PRODUCT_VERSION="7"

安装

1
2
3
4
5
6
7
8
9
10
11
12
13
14
15
16
17
18
19
20
21
22
23
24
25
26
27
28
29
30
31
32
33
34
35
36
37
38
39
40
41
42
43
44
45
46
47
48
#安装包
sudo yum install -y yum-utils

#使用阿里云镜像安装
sudo yum-config-manager \
--add-repo \
http://mirrors.aliyun.com/docker-ce/linux/centos/docker-ce.repo

#更新yum软件包索引
yum makecache fast

#安装docker docker-ce -> 社区版 ee->企业版
sudo yum install docker-ce docker-ce-cli containerd.io

#启动docker
systemctl start docker

#查看当前docker
docker version

Client: Docker Engine - Community
Version: 20.10.1
API version: 1.41
Go version: go1.13.15
Git commit: 831ebea
Built: Tue Dec 15 04:37:17 2020
OS/Arch: linux/amd64
Context: default
Experimental: true

Server: Docker Engine - Community
Engine:
Version: 20.10.1
API version: 1.41 (minimum version 1.12)
Go version: go1.13.15
Git commit: f001486
Built: Tue Dec 15 04:35:42 2020
OS/Arch: linux/amd64
Experimental: false
containerd:
Version: 1.4.3
GitCommit: 269548fa27e0089a8b8278fc4fc781d7f65a939b
runc:
Version: 1.0.0-rc92
GitCommit: ff819c7e9184c13b7c2607fe6c30ae19403a7aff
docker-init:
Version: 0.19.0
GitCommit: de40ad0

Hello world

1
2
3
4
5
6
7
8
9
10
11
12
13
14
15
16
17
18
19
20
21
22
23
24
25
26
27
28
29
30
31
32
33
34
35
#docker Hello world

#运行docker hello-world 镜像
docker run hello-world

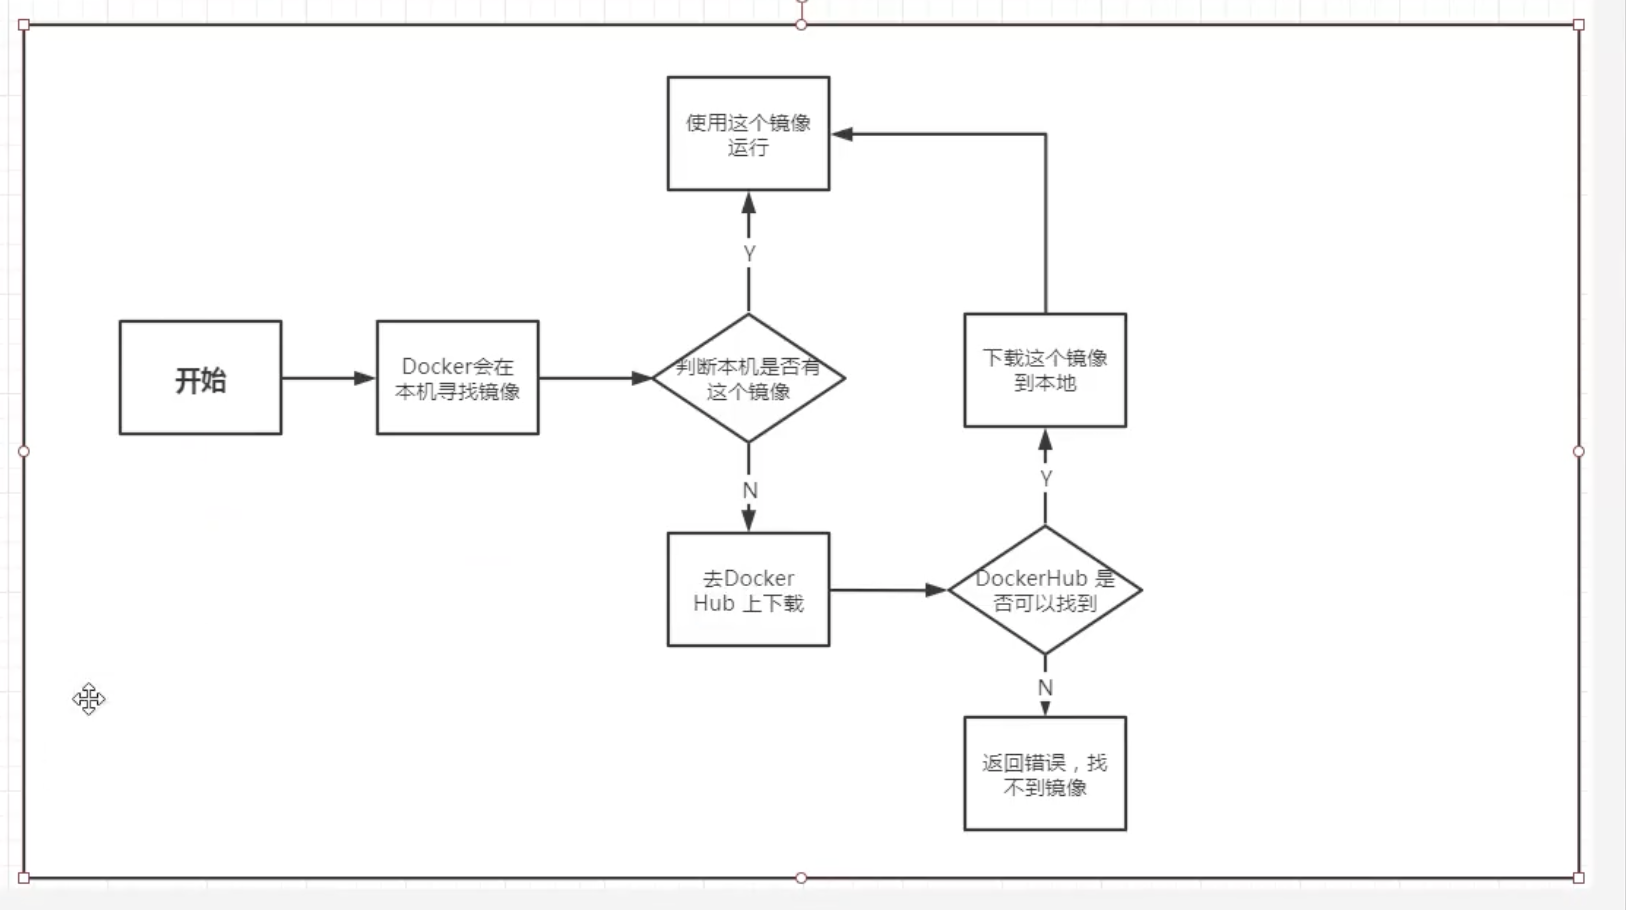
#本地没有找到hello-world
Unable to find image 'hello-world:latest' locally
#线上代码库拉取
latest: Pulling from library/hello-world
#签名信息
0e03bdcc26d7: Pull complete
Digest: sha256:1a523af650137b8accdaed439c17d684df61ee4d74feac151b5b337bd29e7eec
Status: Downloaded newer image for hello-world:latest

#启动成功~
Hello from Docker!
This message shows that your installation appears to be working correctly.

To generate this message, Docker took the following steps:
1. The Docker client contacted the Docker daemon.
2. The Docker daemon pulled the "hello-world" image from the Docker Hub.
(amd64)
3. The Docker daemon created a new container from that image which runs the
executable that produces the output you are currently reading.
4. The Docker daemon streamed that output to the Docker client, which sent it
to your terminal.

To try something more ambitious, you can run an Ubuntu container with:
$ docker run -it ubuntu bash

Share images, automate workflows, and more with a free Docker ID:
https://hub.docker.com/

For more examples and ideas, visit:
https://docs.docker.com/get-started/

查看镜像

1
2
#查看本地镜像
docker images

卸载docker

1
2
3
4
5
6
7
8
#卸载依赖
yum remove docker-ce docker-ce-cli containerd.io

#删除资源
rm -rf /var/lib/docker

#docker的默认工作路径
/var/lib/docker

腾讯云镜像加速

1
2
3
4
5
6
7
8
9
10
11
12
13
14
#创建docker目录
mkdir -p /etc/docker

#配置腾讯云镜像加速地址
tee /etc/docker/daemon.json <<-'EOF'
{
"registry-mirrors": ["https://mirror.ccs.tencentyun.com"]
}
EOF

#重载配置
systemctl daemon-reload
#重启docker
systemctl restart docker

底层原理

docker镜像流程运行分析

image-20201230233606851

底层原理


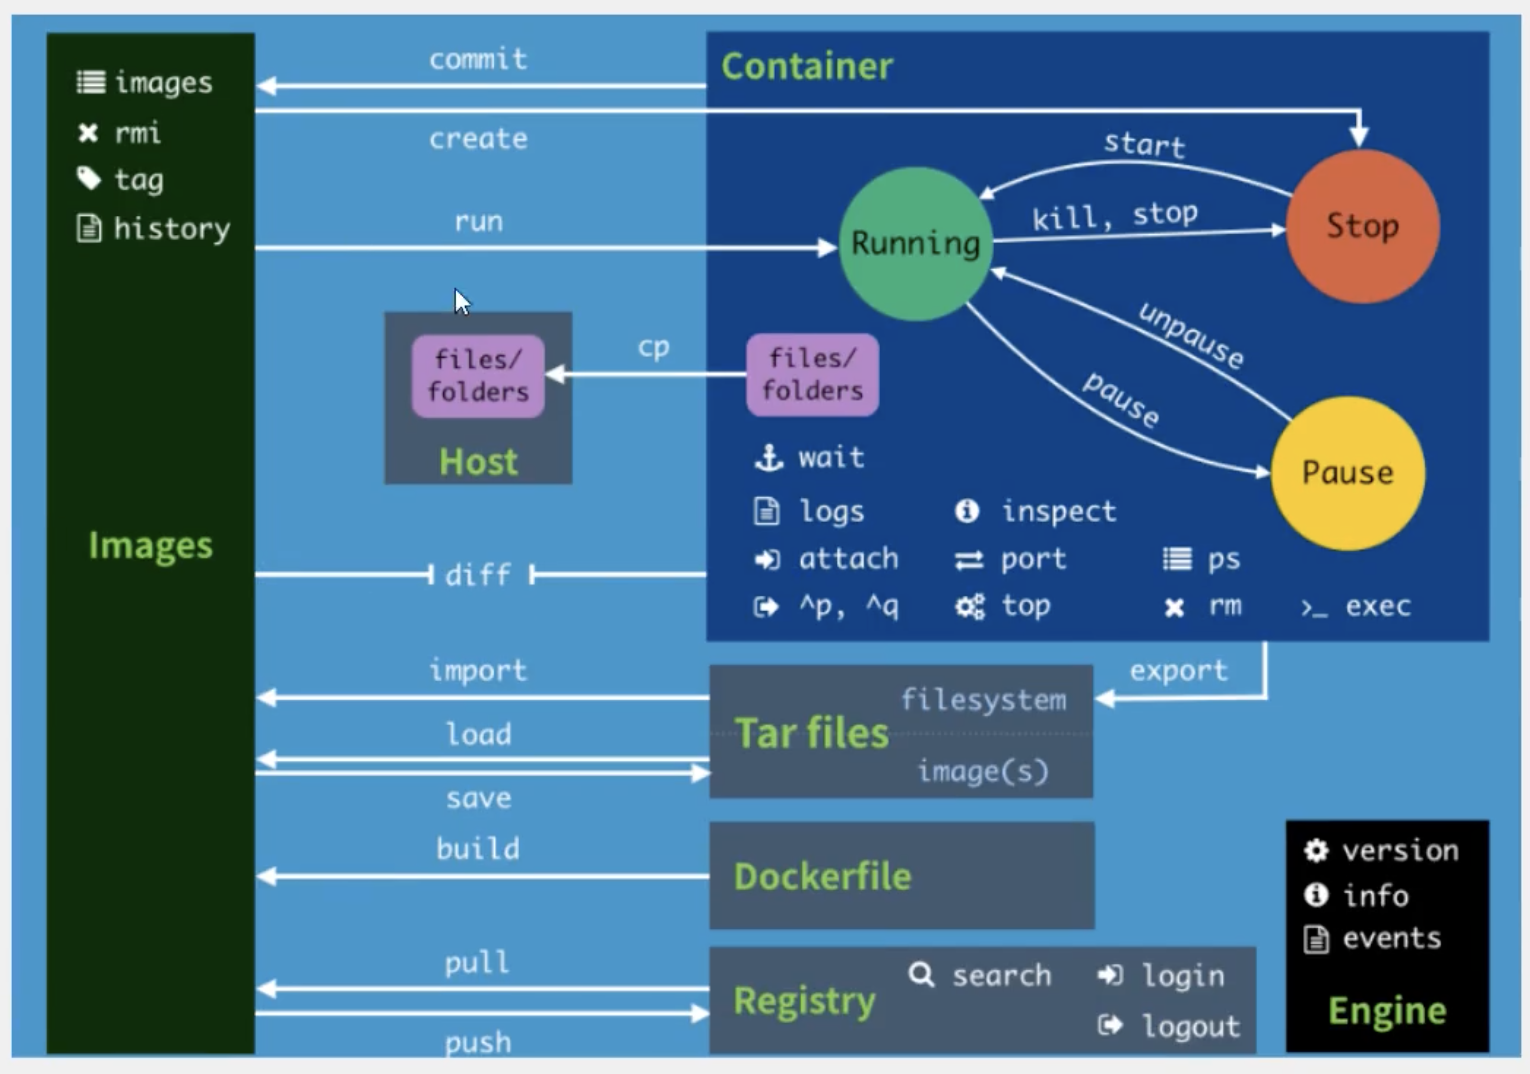
docker工作分析

docker 是一个 client - server 结构的系统,docker 的守护进程运行在主机上. 通过 socket 从客户端访问.

dockerServer 接收到 dockerClient 的指令,就会执行这个命令.
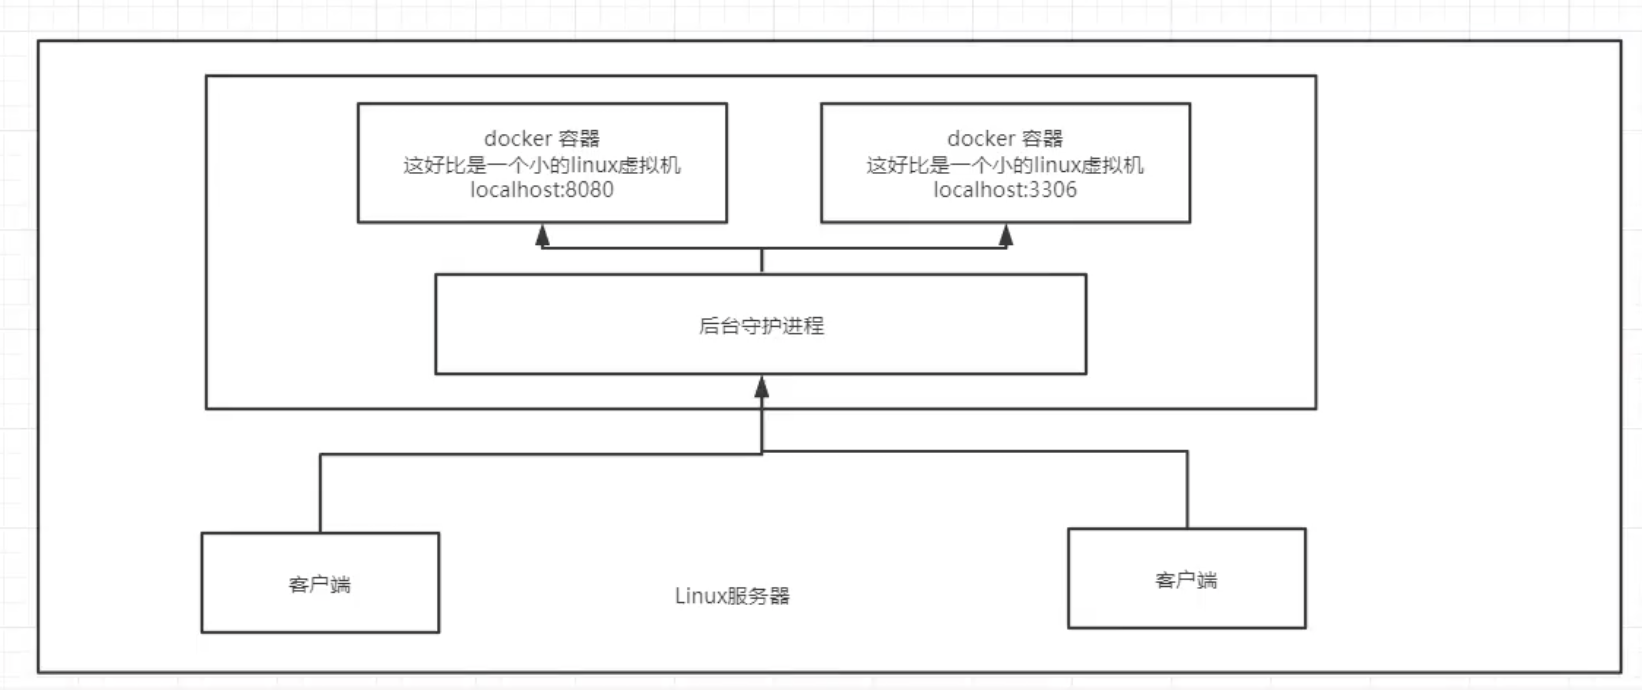
image-20201230234406869

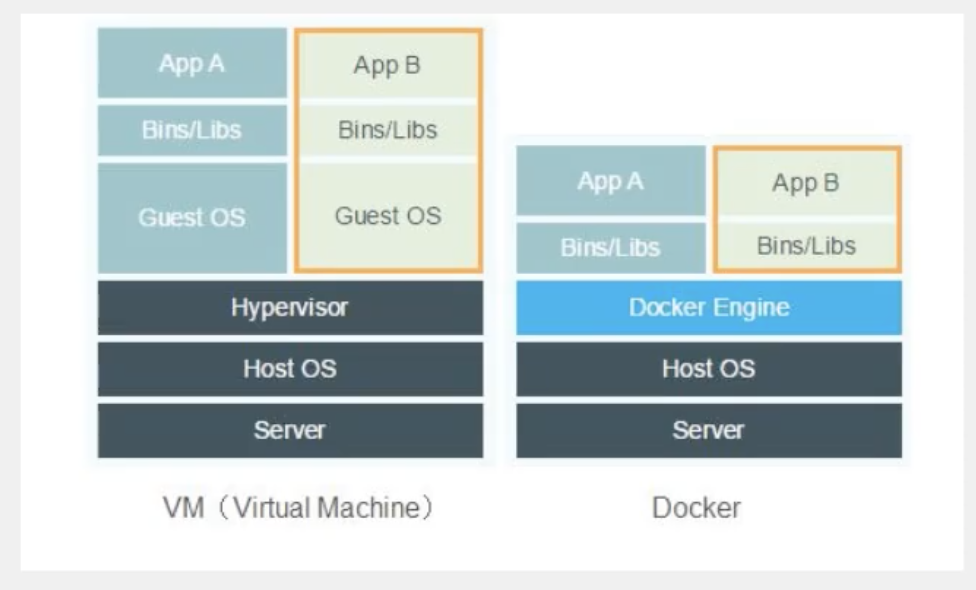
docker为什么比vm快

  1. docker有比虚拟机更少的抽象层
  2. docker 利用的是宿主机的内核,vm 需要的是 Guest OS

image-20201230234815968

新建一个容器的时候,docker不需要像虚拟机一样重新加载一个操作系统的内核,避免引导.

虚拟机加载 Guest OS

docker直接利用 宿主机 的操作系统

docker常用命令

帮助命令


1
2
3
docker version	#显示版本信息
docker info #显示docker信息,包括镜像和容器数量
docker xxx --help #帮助命令

帮助文档:https://docs.docker.com/engine/reference/commandline/docker/

镜像命令


docker images 查看所有本地主机镜像

1
2
3
4
5
6
7
8
9
10
11
12
13
14
15
16
# docker images
REPOSITORY TAG IMAGE ID CREATED SIZE
hello-world latest bf756fb1ae65 12 months ago 13.3kB

REPOSITORY 镜像仓库源
TAG 标签
IMAGE ID 镜像id
CREATED 创建时间
SIZE 镜像大小

#可选项
-a, --all #列出所有镜像
-q, --quiet #只显示镜像id

docker images -aq
bf756fb1ae65

docker search 搜索镜像

1
2
3
4
5
6
7
8
9
10
11
12
13
14
docker search mysql
NAME DESCRIPTION STARS OFFICIAL AUTOMATED
mysql MySQL is a widely used, open-source relation… 10326 [OK]
mariadb MariaDB is a community-developed fork of MyS… 3825 [OK]
mysql/mysql-server Optimized MySQL Server Docker images. Create… 754 [OK]
percona Percona Server is a fork of the MySQL relati… 518 [OK]

#可选项
-f, --filter=STARS=3000 #搜索STARS大于3000的镜像

docker search mysql --filter=STARS=3000
NAME DESCRIPTION STARS OFFICIAL AUTOMATED
mysql MySQL is a widely used, open-source relation… 10326 [OK]
mariadb MariaDB is a community-developed fork of MyS… 3825 [OK]

docker pull 下载镜像

1
2
3
4
5
6
7
8
9
10
11
12
13
14
15
16
17
18
19
20
21
22
23
24
25
26
27
28
29
30
31
32
33
34
35
36
37
38
39
40
41
42
43
44
45
#下载镜像 docker pull 镜像名[:tag]
docker pull mysql

docker pull mysql
Using default tag: latest #如果不写 tag. 默认就是 latest(最新
latest: Pulling from library/mysql
6ec7b7d162b2: Pull complete #分层下载,docker image 核心 联合文件系统
fedd960d3481: Pull complete
7ab947313861: Pull complete
64f92f19e638: Pull complete
3e80b17bff96: Pull complete
014e976799f9: Pull complete
59ae84fee1b3: Pull complete
ffe10de703ea: Pull complete
657af6d90c83: Pull complete
98bfb480322c: Pull complete
6aa3859c4789: Pull complete
1ed875d851ef: Pull complete
Digest: sha256:78800e6d3f1b230e35275145e657b82c3fb02a27b2d8e76aac2f5e90c1c30873 #签名
Status: Downloaded newer image for mysql:latest
docker.io/library/mysql:latest #真实地址

#两个命令相同
docker pull mysql
docker pull docker.io/library/mysql:latest

#下载指定版本
docker pull mysql:5.7

docker pull mysql:5.7
5.7: Pulling from library/mysql
6ec7b7d162b2: Already exists #联合文件系统,不同版本共享.
fedd960d3481: Already exists
7ab947313861: Already exists
64f92f19e638: Already exists
3e80b17bff96: Already exists
014e976799f9: Already exists
59ae84fee1b3: Already exists
7d1da2a18e2e: Pull complete
301a28b700b9: Pull complete
529dc8dbeaf3: Pull complete
bc9d021dc13f: Pull complete
Digest: sha256:c3a567d3e3ad8b05dfce401ed08f0f6bf3f3b64cc17694979d5f2e5d78e10173
Status: Downloaded newer image for mysql:5.7
docker.io/library/mysql:5.7

docker rmi 删除镜像

1
2
3
4
5
6
#删除指定镜像
docker rmi -f 镜像id
#删除多个镜像
docker rmi -f 镜像id1 镜像id2
#递归删除全部镜像
docker rmi -f $(docker images -aq)

容器命令


有了镜像才可以创建容器.

1
docker pull centos

新建容器并启动

1
2
3
4
5
6
7
8
9
10
11
12
13
14
15
16
17
18
19
20
docker run [可选参数] image

#参数说明
--name="Name" 容器名字 Tomcat01 Tomcat02 区分容器
-d 后台方式运行
-it 使用交互方式运行,进入容器查看内容
-p 指定容器端口 -p 8080:8080
-p 主机端口:容器端口
-p ip:主机端口:容器端口
-p 容器端口
容器端口
-P 随机指定端口

#测试 启动并进入容器
[root@VM-0-17-centos ~]# docker run -it centos /bin/bash
#查看容器内的 centos
[root@4bd02727fa42 /]# ls
bin dev etc home lib lib64 lost+found media mnt opt proc root run sbin srv sys tmp usr var
#从容器中退回主机
[root@4bd02727fa42 /]# exit

查看当前正在运行中的容器

1
2
3
4
5
6
7
8
9
10
11
12
#docker ps 命令
#列出当前正在运行的容器
-a #列出当前正在运行的容器和历史运行过的容器
-n=? #显示最近创建过的容器
-q #只显示容器编号

[root@VM-0-17-centos ~]# docker ps
CONTAINER ID IMAGE COMMAND CREATED STATUS PORTS NAMES
[root@VM-0-17-centos ~]# docker ps -a
CONTAINER ID IMAGE COMMAND CREATED STATUS PORTS NAMES
4bd02727fa42 centos "/bin/bash" 3 minutes ago Exited (0) About a minute ago gallant_mcclintock
2a474202357b bf756fb1ae65 "/hello" 42 hours ago Exited (0) 42 hours ago vibrant_dijkstra

退出容器

1
2
exit	#停止容器并退出
control + p + q #快捷键 容器不停止退出

删除容器

1
2
3
docker rm 容器id						#删除指定容器,不能删除正在运行的容器 rm -f 强制删除
docker rm -f $(docker ps -aq) #删除所有容器
docker ps -a -q|xargs docker rm #删除所有容器

启动和停止容器

1
2
3
4
docker start 容器id		#启动容器
docker restart 容器id #重启容器
docker stop 容器id #停止容器
docker kill 容器id #强制停止

run是创建并启动容器(run操作的是镜像),start启动已经停止的容器(操作的是容器id)

常用的其他命令


后台启动容器

1
2
3
4
5
6
7
8
# 命令 docker run -d 镜像名
[root@VM-0-17-centos ~]# docker run -d centos

# docker ps 发现 centos 停止了

# 常见的坑 docker 容器 使用后台运行,就必须要有一个前台进程.docker 一旦发现没有应用,就会停止.

# nginx 容器启动后,发现自己没有提供服务,就会立刻停止,就是没有程序了.

查看日志

1
2
3
4
5
#查看日志
# -t 时间戳
# -f 动态显示
# --tail num 显示日志条数
docker logs -tf --tail 10 容器id

进程信息

1
2
3
4
5
#
docker top 容器id

# 查看容器信息
docker inspect 容器id

进入当前正在运行容器

1
2
3
4
5
6
7
8
9
10
11
#进入后台已经启动的容器

#方式一
docker exec -it 容器id /bin/bash

#方式二
docker attach 容器id

#区别
#docker exec -> 进入容器后开启一个新的终端,可以在容器里操作.
#docker attach -> 进入容器正在执行的终端.不会启动新的进程.

从容器内拷贝文件到主机上

1
2
3
4
5
6
7
8
docker cp 容器id:容器内路径 目标主机路径

[root@VM-0-17-centos ~]# docker cp 61d98e6376ff:/home/xixi.java home
[root@VM-0-17-centos ~]# ls
home
[root@VM-0-17-centos ~]# cd home
[root@VM-0-17-centos home]# ls
xixi.java

image-20210109000558383

Docker 安装 nginx

1
2
3
4
5
#docker 拉取 nginx
[root@VM-0-17-centos ~]# docker pull nginx

# -d 后台运行 --name 容器命名 -p 宿主机端口:容器内部端口
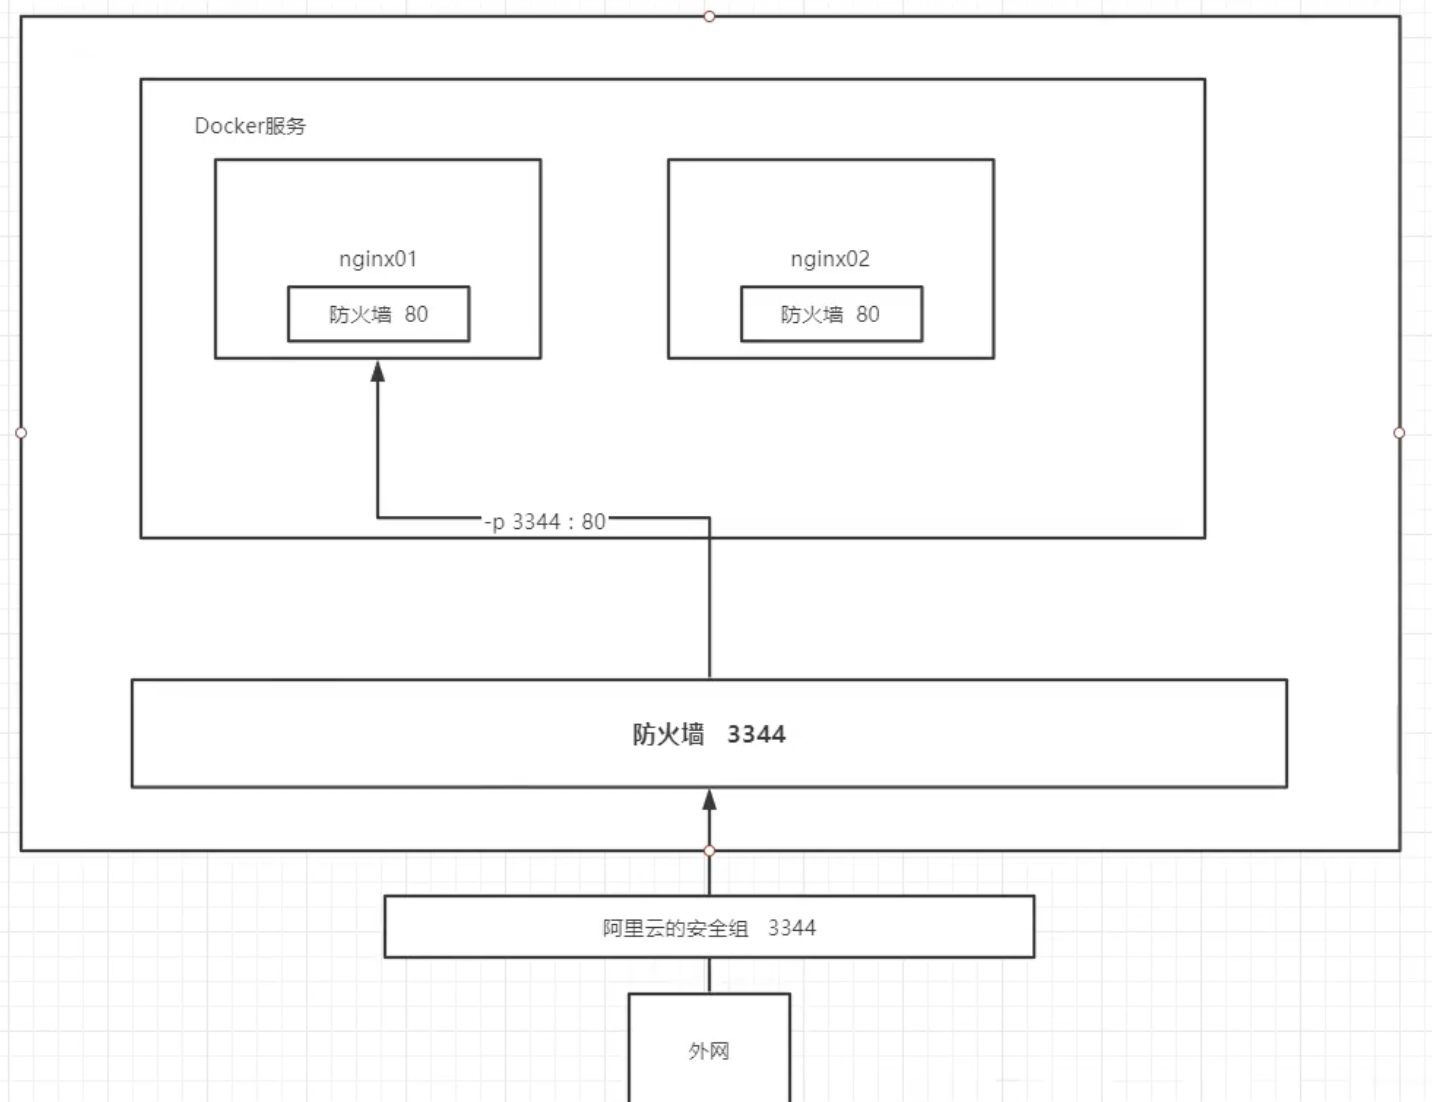
[root@VM-0-17-centos ~]# docker run -d --name nginx01 -p 3344:80 nginx

端口转发

image-20210109002251976

docker安装Tomcat

1
2
3
4
5
6
7
8
9
10
11
12
13
14
15
#官方的使用
docker run -it --rm tomcat:9.0

#之前都是后台启动,停止容器后还是能查到 docker run -it --rm 一般用来测试.用完就删除
docker pull tomcat:9.0

#进入容器
[root@VM-0-17-centos ~]# docker exec -it tomcat01 /bin/bash

#阉割过的版本
root@269815ce7ea6:/usr/local/tomcat# cd webapps
root@269815ce7ea6:/usr/local/tomcat/webapps# ls

#拷贝webapps.dist文件夹里的目录到webapps.再次访问tomcat
root@269815ce7ea6:/usr/local/tomcat# cp -r webapps.dist/* webapps

docker安装 es + kibana

1
2
3
4
5
6
7
8
9
10
11
12
13
14
#es 暴露的端口很多
#es 十分耗内存
#es 数据一般需要放置到安全目录 挂载

#--net somenetwork 网络配置
#启动es
#启动失败...es默认1.2g我的服务器LIMIT只有991.1MiB
docker run -d --name elasticsearch -p 9200:9200 -p 9300:9300 -e "discovery.type=single-node" elasticsearch:7.6.2

#查看状态
docker stats

#增加内存限制,修改配置文件 -e 配置环境修改
docker run -d --name elasticsearch -p 9200:9200 -p 9300:9300 -e "discovery.type=single-node" -e ES_JAVA_OPTS="-Xms64m -Xms=128m" elasticsearch:7.6.2

可视化


portainer

图形化界面管理工具

1
docker pull portainer/portainer-ce

Rancher(CI/CD)

docker镜像理解

镜像是什么


镜像是一种可执行、轻量级的独立软件包,用来打包软件运行环境和基于运行环境开发的软件,它包含运行某个软件所需的所有内容,包括代码、运行时、库、环境变量和配置文件.

所有应用,打包docker镜像,就可以直接跑起来.

如何得到镜像?

远程仓库下载
直接拷贝

自己制作一个镜像DockerFile

docker镜像加载原理


UnionFS(联合文件系统)

Union文件系统是一种分层、轻量级且高性能的文件系统.它支持对文件系统的修改作为一次提交来一层层叠加.同时可以将不同目录挂载到同一个虚拟文件系统下.Union文件系统是docker镜像的基础.镜像可以通过分层来进行继承,基于基础镜像(没有父镜像),可以制作各种具体的应用镜像.

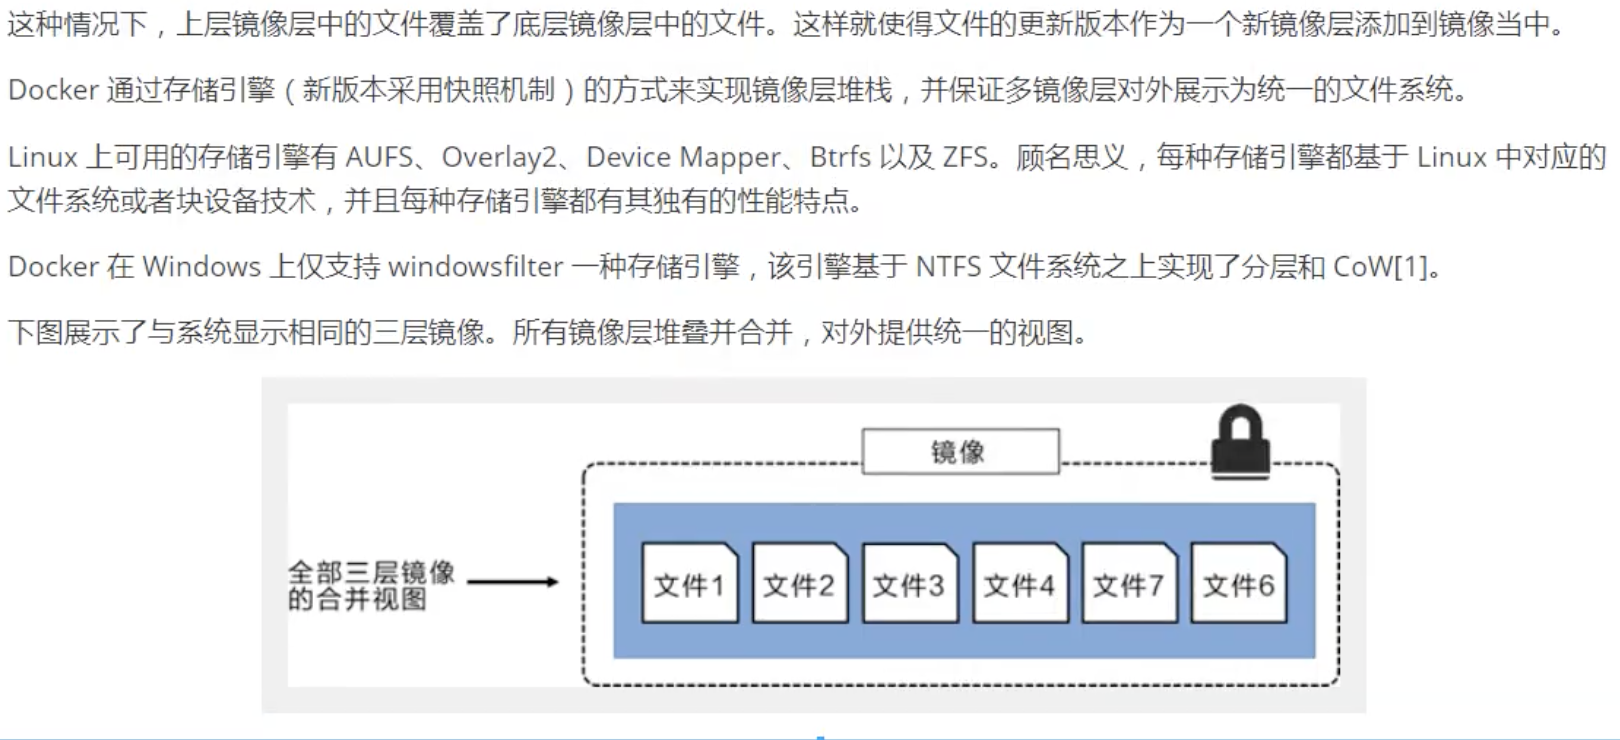
特性:一次同时加载多个文件系统,但从外面看来,只能看到一个文件系统,联合加载会把各层文件系统叠加起来,这样最终的文件系统会包含所有底层的文件和目录.

docker镜像加载原理

docker镜像实际上是由一层一层的文件系统组成的,这种层级的文件系统UnionFS

boot file system 主要包含了bootloader 和 kernel,bootloader主要引导加载kernel.

linux刚启动时会加载 bootfs文件系统,在docker镜像的最底层是bootfs.这一层和典型的linux/Unix系统是一样的.包含boot加载器和内核.当boot加载完成之后整个内核就在内存中了,此时内存的使用权已由bootfs转交给内核.此时文件系统也会卸载bootfs.

rootfs,在bootfs之上.包含的就是典型的linux系统中的/dev,/proc,/bin,/etc等标准目录和文件.rootfs就是各种不同的操作系统发行版.比如Ubuntu、centos等等…
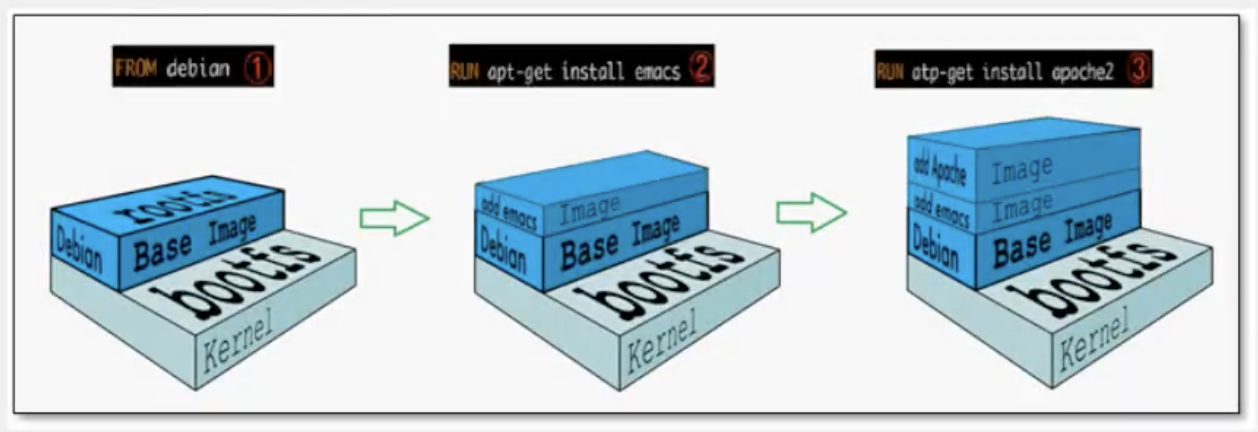
image-20210111004456791

平时安装的centos好几G.docker才200m

image-20210111005131895

对于一个精简的os.rootfs可以很小,只需要包含最基本的命令、工具和程序库就可以了.因为底层用的是host的kernel,自己只需要提供rootfs就可以了.由此可见对于不同的linux发行部,bootfs基本是一致的.rootfs会有差别,因此不同的发行版可以公用bootfs.

分层镜像

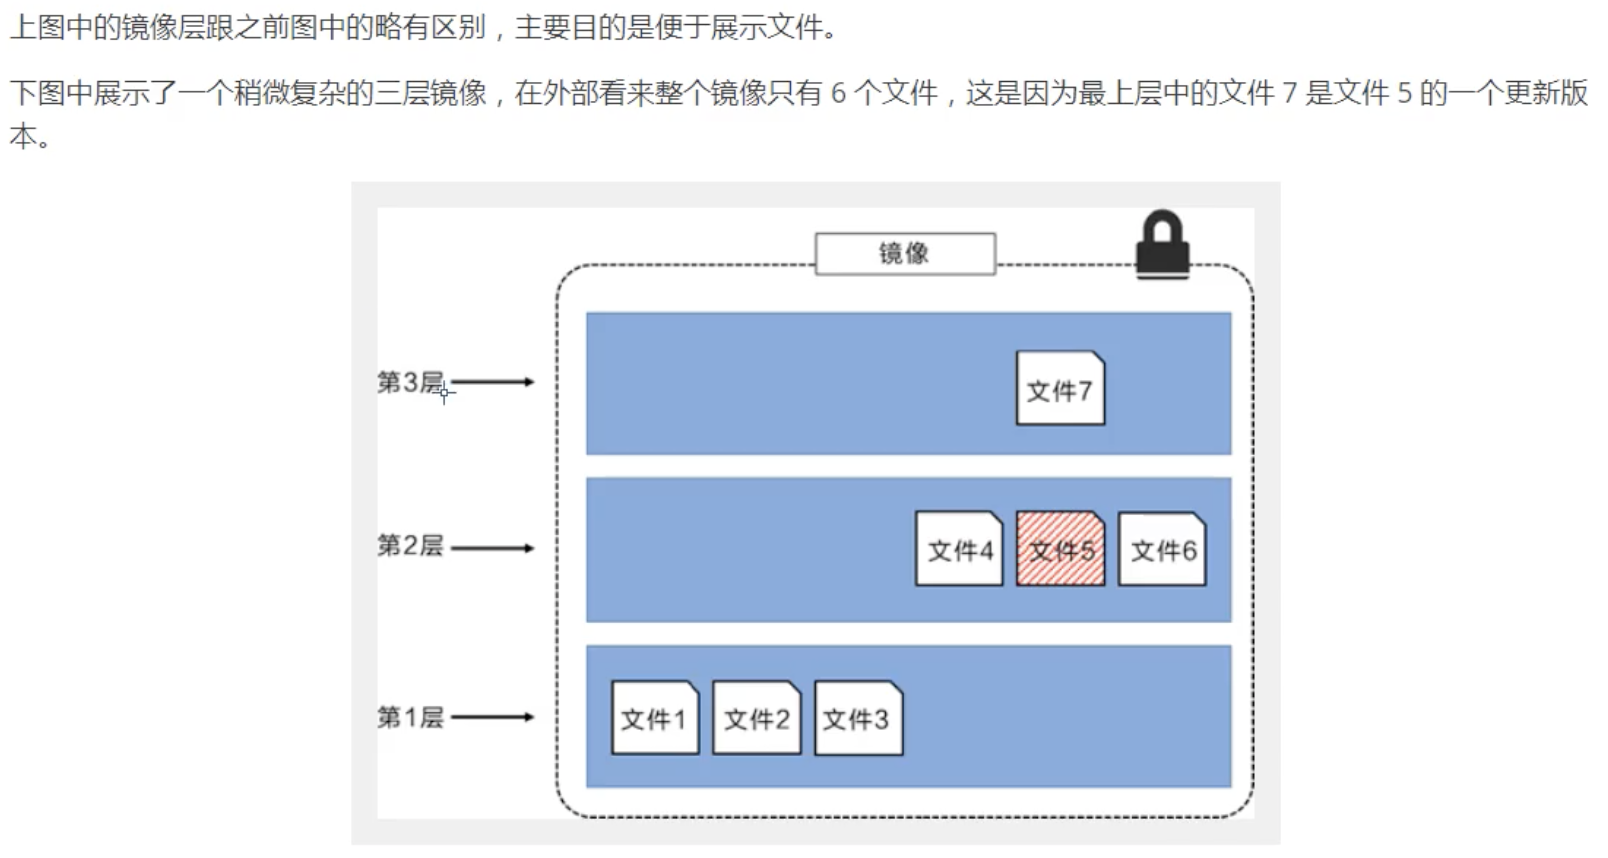
docker镜同时像采取这种分层结构.最大的好处,莫过于资源共享.比如有多个镜像都从相同的base镜像构建而来.那么宿主机只需要在磁盘上保留一份base镜像,同时内存中也只需要加载一份base镜像,这样就可以为所有容器服务了,而且镜像的每一层都可以被共享.

查看镜像分层的方式可以通过docker image inspect 命令!

理解:
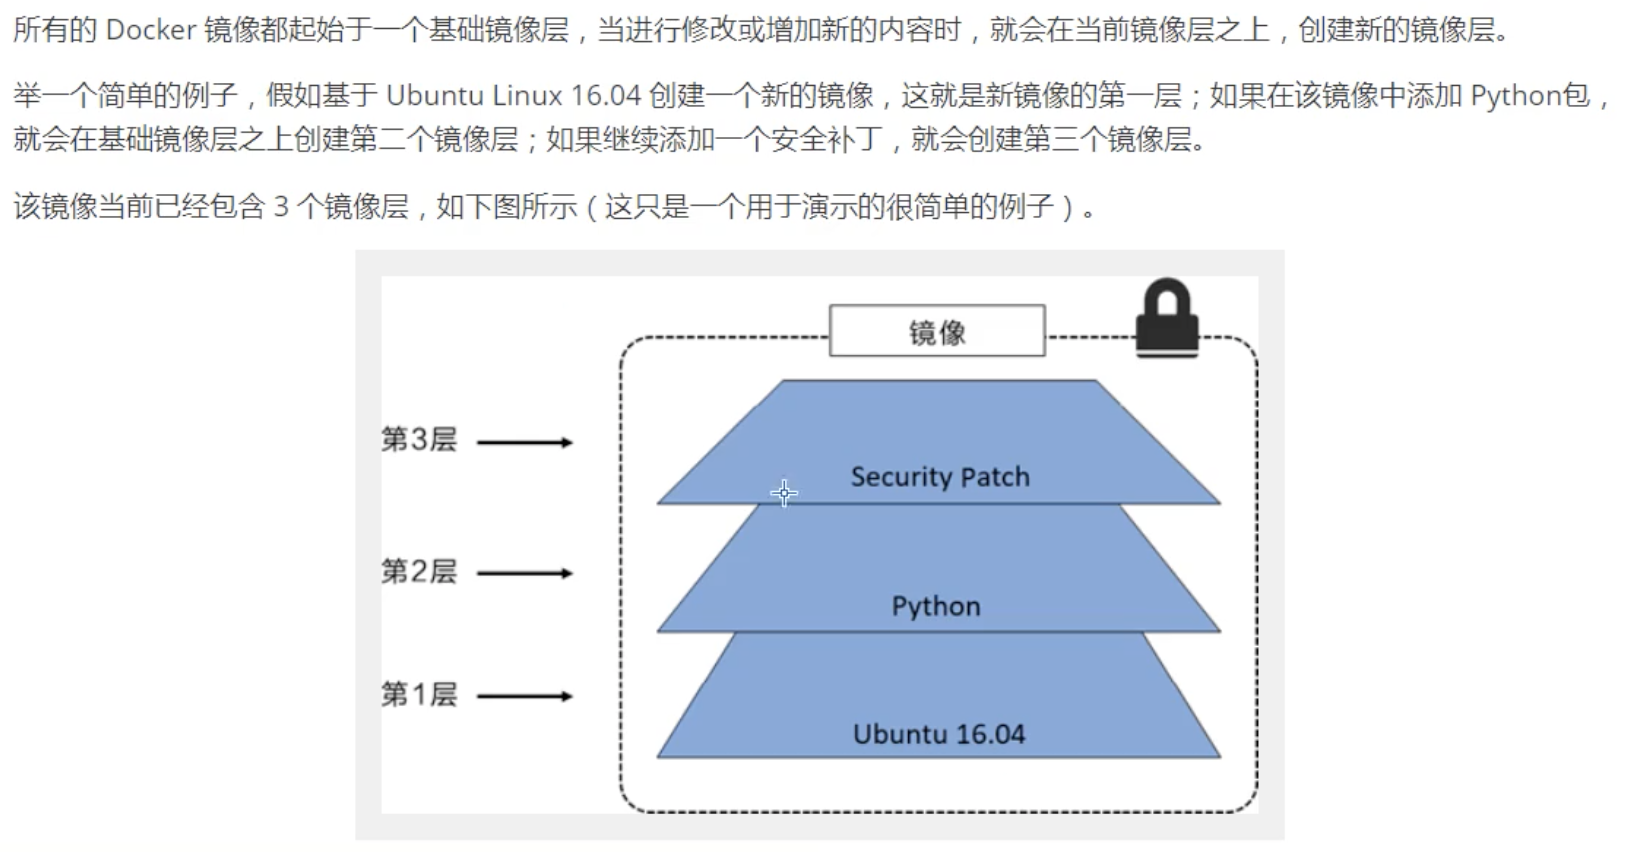
image-20210111011032849

image-20210111011239495

image-20210111011355450

image-20210111011550711

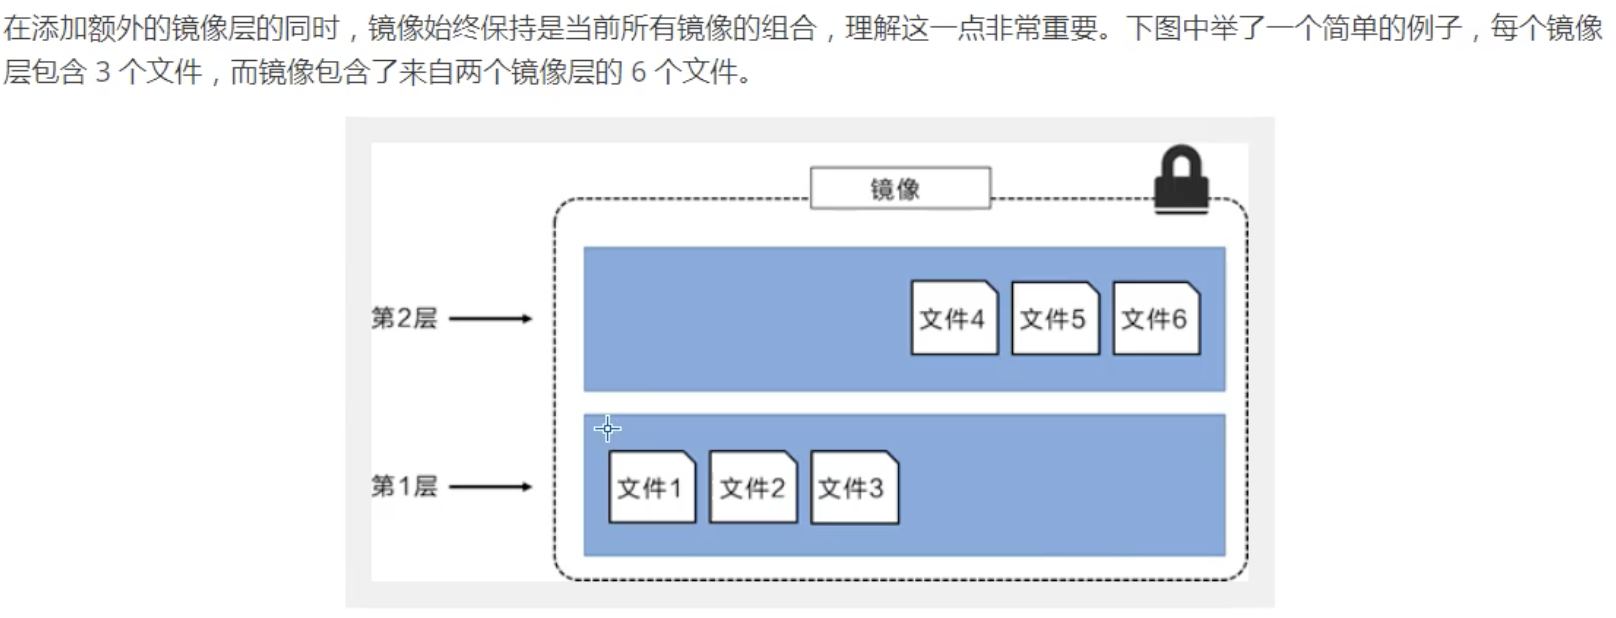
docker镜像都是只读.当容器启动时,一个新的可写层被加载到镜像顶部.

这一层就是通常说的容器层,容器之下都叫镜像层.

image-20210111012113297

commit镜像

1
2
3
4
docker commit 提交容器成为一个新的副本

# 命令和git原理类似
docker commit -m="提交描述信息" -a="作者" 容器id 目标镜像名: [TAG]

容器数据卷

数据持久化

容器之间数据共享.

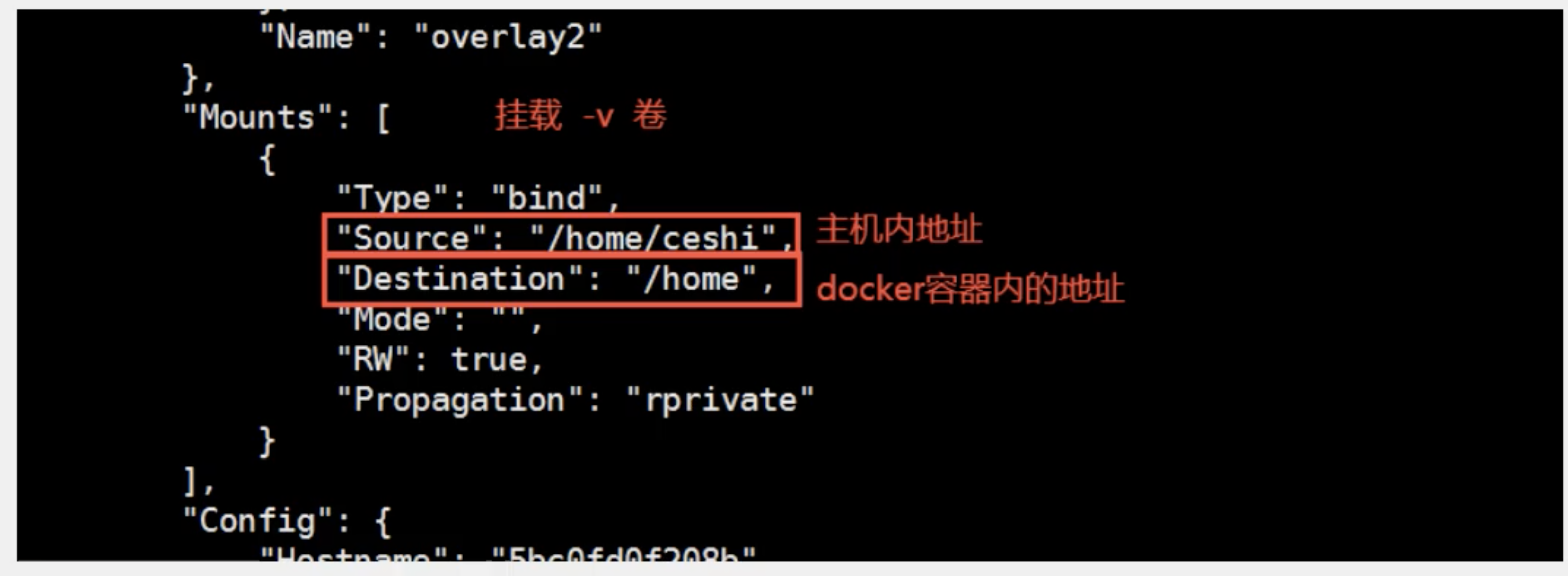
Docker容器中产生的数据,同步到本地.目录挂载,将容器的目录,挂载到Linux上.
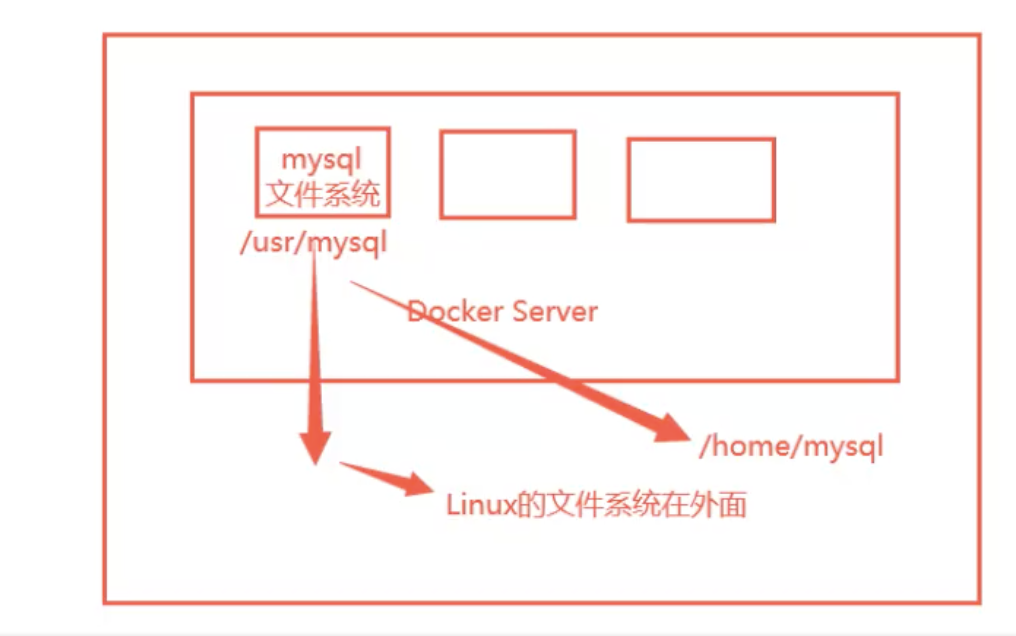
image-20210126170148931

容器的持久化和同步操作,容器之间可以数据共享.

使用容器数据卷

1
2
docker run -it -v 主机目录:容器内目录
#启动之后 可以通过docker inspect 容器id

image-20210126175000282

具名挂载和匿名挂载

1
2
3
4
5
6
#匿名挂载
-v 容器内路径
docker run -d -p --name nginx01 -v /ect/nginx nginx

#查看所有的 volume 的情况
docker volume ls

DockerFile

DockerFile构建过程

每个保留关键字都必须是大写

执行 从上到下

表示 注释

每个命令都会创建一个新的镜像层,并提交.
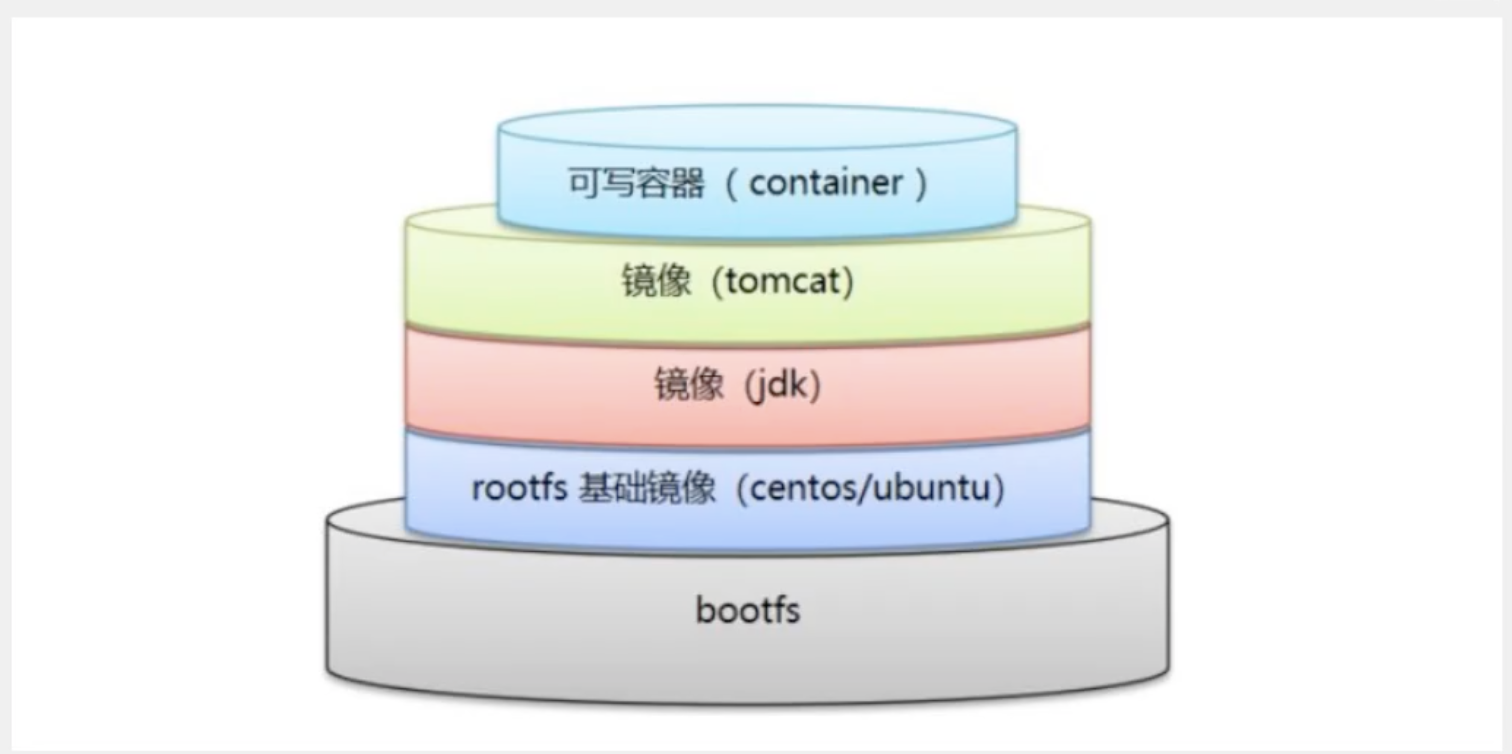
image-20210127215642631

dockerfile面向开发,发布制作镜像需要编写dockerfile文件.

docker镜像成为交付标准.

dockerfile:构建文件,定义了一切的步骤,包括源代码.

dockerimages:通过dockerfile构建生成的镜像,最终发布运行的

docker容器:容器就是镜像运行起来提供的服务器

DockerFile命令

1
2
3
4
5
6
7
8
9
10
11
12
FROM				# 基础镜像,一切从这里开始构建
MAINTAINER # 镜像是谁写的,姓名+邮箱
RUN # 镜像构建的时候需要运行的命令
ADD # 步骤: tomcat镜像,这个tomcat压缩包!添加内容
WORKDIR # 镜像的工作目录
VOLUME # 挂载目录
EXPOSE # 保留端口配置
CMD # 指定容器启动的命令,只有最后一个会生效,可被替代
ENTRYPOINT # 指定容器启动要运行的命令,可以追加命令
ONBUILD # 当构建一个被继承的 dockerfile 的时候,运行ONBUILD的指令
COPY # 类似ADD,将文件拷贝到镜像中
ENV # 构建的时候设置环境变量

构建自己的centos

1
2
3
4
5
6
7
8
9
10
11
12
13
14
15
16
17
18
19
20
21
22
23
24
[root@VM-0-17-centos dockerfile]# cat mydockerfile
FROM centos
MAINTAINER cscar<c@cscar.me>

ENV MYPATH /usr/local
WORKDIR $MYPATH

RUN yum -y install vim
RUN yum -y install net-tools

EXPOSE 80

CMD echo $MYPATH
CMD echo "---end---"
CMD /bin/bash

# 2.通过这个文件构建镜像
# 命令 docker build -f dockerfile文件路径 -t 镜像名:[tag] .

# 3.测试运行
[root@VM-0-17-centos ~]# docker run -it mycentos:1.0
[root@3b283116bf5a local]# pwd
/usr/local
[root@3b283116bf5a local]#